Contrail has always had its own GUI; anyhow, recently, Juniper started developing a new GUI that can be used to manage your cluster: Contrail Command.
Contrail Command is not just a GUI to monitor/configure contrail but, through a “module” called Contrail fabric manager, it also allows to manage the IP fabric of your datacenter.
This lab aims at showing how those 3 elements, Contrail, Contrail Command and IP Fabric have to be built and how they interact with each other.
Lab is pretty simple and totally built in a virtual environment. Server are Centos VMs while IP fabric switches are vQFX VMs.
The following image shows the topology:
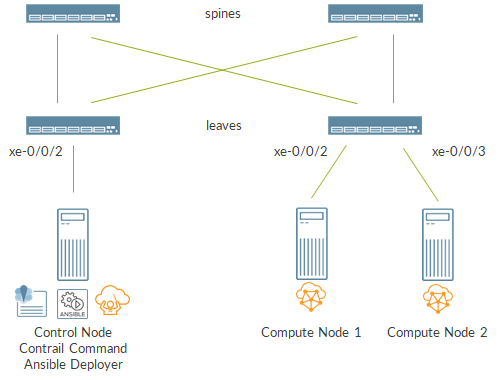
There are 3 servers that will create our Contrail Cloud. Two servers are standard compute nodes. The third server will be the Contrail Control but will also be used to build the cloud itself via the Ansible Deployer. Moreover, this server will also host the new Contrail Command GUI.
Contrail Command does not come by default with a new fresh Contrail installation. It is not a built-in module. It is a separate tool that has to be installed on a server. This server might be a standalone server able to reach the actual contrail cluster nodes and import information about the cluster.
Anyhow, for simplicity and to save VMs, I decided to deploy Contrail Command on the same node acting as Contrail Control.
Right now (version 1911) Contrail Command does not support HA, meaning we cannot instantiate 3 Contrail Commands VMs so to provide redundant services. We are limited to one Command.
Anyhow, this lab is not focused on HA capabilities and even the Contrail cluster will have a single Control node.
Servers are connected to a 2×2 IP Fabric made of vqfx VMx. This IP fabric will be managed by Contrail Command and will provide connectivity between servers over the so-called “Contrail control+data network”.
All the servers are also connected to the out of band management network (not showed here).
First of all, we need to prepare the right environment for the servers.
For compute nodes we simply need to run:
yum update -y && yum install -y python-devel gcc tmux && reboot
On the control node, that will also act as Ansible deployer and run Contrail Command, we need to execute:
yum -y update
yum -y install nano
yum -y install git ansible-2.4.2.0
yum -y install epel-release net-tools
yum install -y python-pip
yum install -y tmux
pip install requests
yum install -y python-devel gcc
reboot
Be sure to copy/download the ansible deployer tgz file on the Control node for the right Contrail version (here I used 1911).
At the beginning, the contrail control+data network will not be available; we will create that “vlan” using Contrail Command hence we first need Command.
Anyhow, we can already configure the second interface, the one connected to the fabric (and to the control+data network), on all the servers.
Control node will be assigned address 192.168.200.2 while compute nodes will be assigned addresses 192.168.200.11 and 192.168.200.12 respectively.
To make configurations permanent I added file /etc/sysconfig/network-scripts/ifcfg-ens3f1 file on all the 3 VMs:
DEVICE=ens3f1
TYPE=Ethernet
BOOTPROTO=static
ONBOOT=yes
USERCTL=yes
IPV6INIT=no
IPADDR=192.168.200.2
NETMASK=255.255.255.0
GATEWAY=192.168.200.1
DEFROUTE=no
NM_CONTROLLED=no

DEVICE=ens3f1
TYPE=Ethernet
BOOTPROTO=static
ONBOOT=yes
USERCTL=yes
IPV6INIT=no
IPADDR=192.168.200.11
NETMASK=255.255.255.0
GATEWAY=192.168.200.1
DEFROUTE=no
NM_CONTROLLED=no

DEVICE=ens3f1
TYPE=Ethernet
BOOTPROTO=static
ONBOOT=yes
USERCTL=yes
IPV6INIT=no
IPADDR=192.168.200.12
NETMASK=255.255.255.0
GATEWAY=192.168.200.1
DEFROUTE=no
NM_CONTROLLED=no
Next, I run
service network restart
I said Contrail Command can manage both the contrail cluster and the IP Fabric. This is true but, actually, Command only provides a GUI; it does not provide the logic. The logic is still hosted on contrail nodes (contrail control). For this reason, when giving life to Command, a Contrail cluster must already be available and Command has to import it.
This scenario is often said to be like “the chicken and the egg” dilemma: we need Command to manage Contrail but we need Contrail to make Command work. Moreover, to have Contrail fully operation we need the control+data network but that network lives on the fabric and we first need Command to be able to provision that network…but, again, command works only if Contrail is already there. Seems a deadlock…what a headache!
In this document, I try to provide a workflow that allows us to perform all the required tasks without the need to have multiple command instances importing multiple contrail clusters at different stages.
This methodology works fine for learning purposes but it might not be applicable to production environments as-is. When trying to bring Command into real production environments, considerations have to be made based on several factors: IP fabric management connectivity and Contrail provisioning tool (ansible, rhosp, juju, etc…) to name two key ones.
As said before, Command needs an existing cluster in order to work and connect to the fabric.
We need to create a Contrail cluster. As we want to rely on the control+data network, currently not existing, we cannot build a full cluster (control + compute) as communications over the control+data network between nodes would not work.
For this reason, I start by creating an all-in-one control-only cluster. This means that my cluster, initially, will only include a control node.
To achieve this, we need to configure file instances.yaml properly:
###FILE USED TO DESCRIBE THE CONTRAIL CLOUD THAT ANSIBLE DEPLOYER HAS TO BUILD
global_configuration:
  CONTAINER_REGISTRY: hub.juniper.net/contrail
  CONTAINER_REGISTRY_USERNAME: JNPR-FieldUser60
  CONTAINER_REGISTRY_PASSWORD: Lq8UYTzuQ6NmgeCSDpVF
provider_config:
  bms:
    ssh_user: root
    ssh_pwd: Embe1mpls
    ntpserver: 10.102.255.254
    domainsuffix: commandumberto.net
instances:
  control_1:
    provider: bms
    ip: 10.102.161.161
    roles:
      config:
      config_database:
      control:
      webui:
      analytics:
      analytics_database:
      openstack:
      openstack_compute:
contrail_configuration:
  CLOUD_ORCHESTRATOR: openstack
  CONTRAIL_CONTAINER_TAG: 1911.31
  CONTRAIL_VERSION: 1911.31
  OPENSTACK_VERSION: queens
  ENCAP_PRIORITY: "VXLAN,MPLSoUDP,MPLSoGRE"
  BGP_ASN: 65100
  CONFIG_NODEMGR__DEFAULTS__minimum_diskGB: 2
  DATABASE_NODEMGR__DEFAULTS__minimum_diskGB: 2
  CONFIG_DATABASE_NODEMGR__DEFAULTS__minimum_diskGB: 2
  RABBITMQ_NODE_PORT: 5673
  AUTH_MODE: keystone
  KEYSTONE_AUTH_URL_VERSION: /v3
  VROUTER_GATEWAY: 192.168.200.1
  CONTROLLER_NODES: 10.102.161.161
  CONTROL_NODES: 192.168.200.2
kolla_config:
  kolla_globals:
    enable_haproxy: no
    enable_ironic: no
    enable_swift: no
    enable_barbican: no
  kolla_passwords:
    keystone_admin_password: contrail123
    metadata_secret: meta123
I will not go into all the details but I want to highlight some key aspects of this configuration.
Let’s look at control node roles:
  control_1:
    provider: bms
    ip: 10.102.161.161
    roles:
      …
      openstack:
      openstack_compute:
I have both Openstack (control functions) and Openstack-compute (compute-functions). This is necessary as Contrail Ansible deployer needs at least one Openstack compute node to be present inside instances.yaml. If not, deployer will raise an error and fail. The drawback is that this node will appear as a hypervisor from an Openstack nova perspective but this can be easily solved by disabling compute services on this node once the cluster is up and running.
Anyhow, even if Openstack-compute role is included, this node would not be a real compute node as it does not include the vrouter one.
This is one example of what I was saying before when warning that this procedure might vary based on the specific setup details.
Setting the right encap priority is fundamental:
ENCAP_PRIORITY: "VXLAN,MPLSoUDP,MPLSoGRE"
VXLAN must be first otherwise interaction with IP fabric will not work!
We also specify on which network services will run:
VROUTER_GATEWAY: 192.168.200.1
CONTROLLER_NODES: 10.102.161.161
CONTROL_NODES: 192.168.200.2
For instance, xmpp and vms overlay will run on the control data network (192.168.200.0/24) while config data (port 8082) will run on the oob management network.
As already said, control+data network is not yet available as it will be configured on the IP fabric. Anyhow, we already need to define which connections will have to transit through it. The reason behind this will be more clear later on.
Right now, making some services available over a non-existing control+data network is not an issue as, having just a single node, there are no node-to-node communications.
I also copy te instances.yaml file into my home folder; it will be handy when setting up command.
Next, I install Contrail using common ansible deployer commands:
ansible-playbook -e orchestrator=openstack -i inventory/ playbooks/configure_instances.yml
ansible-playbook -e orchestrator=openstack -i inventory/ playbooks/install_openstack.yml
ansible-playbook -e orchestrator=openstack -i inventory/ playbooks/install_contrail.yml
Now, it is time to install Command.
Installation will take place on the same node.
First, we need to login to Juniper docker hub repository:
cd
docker login hub.juniper.net \
   --username … \
   --password …
and we pull the command deployer image:
docker pull hub.juniper.net/contrail/contrail-command-deployer:1911.31
Similarly to Contrail, also Command needs a file describing the object we are going to install:
vi ccconfig.yml
Inside this file we have:
---
command_servers:
    server1:
        ip: 10.102.161.161
        connection: ssh
        ssh_user: root
        ssh_pass: Embe1mpls
        sudo_pass: Embe1mpls
        ntpserver: 10.102.255.254

        registry_insecure: false
        container_registry: hub.juniper.net/contrail
        container_tag: 1911.31
        container_registry_username: …
        container_registry_password: …
        config_dir: /etc/contrail

        contrail_config:
            database:
                type: postgres
                dialect: postgres
                password: contrail123
            keystone:
                assignment:
                    data:
                      users:
                        admin:
                          password: contrail123
            insecure: true
            client:
              password: contrail123
Yaml file includes standard fields like server management credentials, container image tag, credentials to access docker hub repository and other authentication parameters (keystone password, command gui password and postgres database credentials).
Finally, we run a container that will install command:
docker run -td --net host -e orchestrator=openstack -e action=import_cluster -v /root/ccconfig.yml:/command_servers.yml -v /root/instances.yaml:/instances.yml --privileged --name contrail_command_deployer hub.juniper.net/contrail/contrail-command-deployer:1911.31
Please notice, we are not only installing command but also importing the cluster we created before. This is done by passing the environment variable action=import_cluster and the instances.yaml file as a volume.
It is possible to monitor installation by running:
docker logs -f contrail-command-deployer
If everything goes fine we might have our Contrail Command ready in few minutes.
We can access command via browser by pointing to https://:9091 .
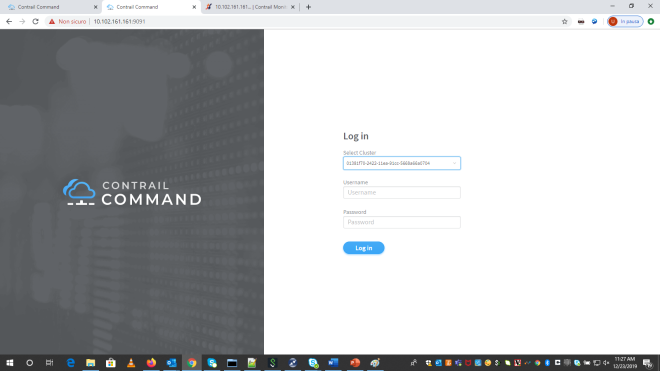
You will notice that we can already select a cluster; this is because we imported our single node control-only cluster.
Next step will be IP fabric onboarding so that Command can manage switches and data center overlay!
Ciao
IoSonoUmberto

2 thoughts on “Contrail Command: installation and cluster import”